This technical blog is cross-posted on Medium.
So you use your WordPress site to publicly share documents with the world. Maybe they’re photographs in your portfolio, records of minutes from your recurring meetings, homework assignments and materials for your students … or maybe they’re responsive documents from 400 public records requests. You use your site to present these documents in some sort of helpful structure.
And maybe you’ve just acquired, say, 1,400 new documents detailing the use of facial recognition across Massachusetts government agencies, which will require dozens of new structured pages with hundreds of repeated elements to properly display. Manually making all of these new pages with all of these new documents would take approximately infinity hours, and would be absolutely soul-sucking along the way.
But good news: if you’ve got some coding skills, it’s possible to programmatically create all your pages with some setup, some Python, minimal PHP, and the click of a button.
Things you’ll need:
- WordPress site
- SSH or FTP access to the server hosting your WordPress site
- Intermediate comfort with Python
- Openness to using basic PHP
- A deep-seated resentment for repetitive tasks
Here’s the process:
- Get your documents in order
- Generate content for (many) WordPress pages
- Write PHP commands to create (many) WordPress pages
- Run PHP snippet and publish – once!
The code from steps 2 and 3 is also available in this Jupyter notebook on GitHub.
A quick note before we start: our particular WordPress setup includes hosting with DigitalOcean, WordPress editing with Visual Composer, and formatting via the Uncode theme. Some of the code and methods outlined here are particular to these specs.
1. Get your documents in order
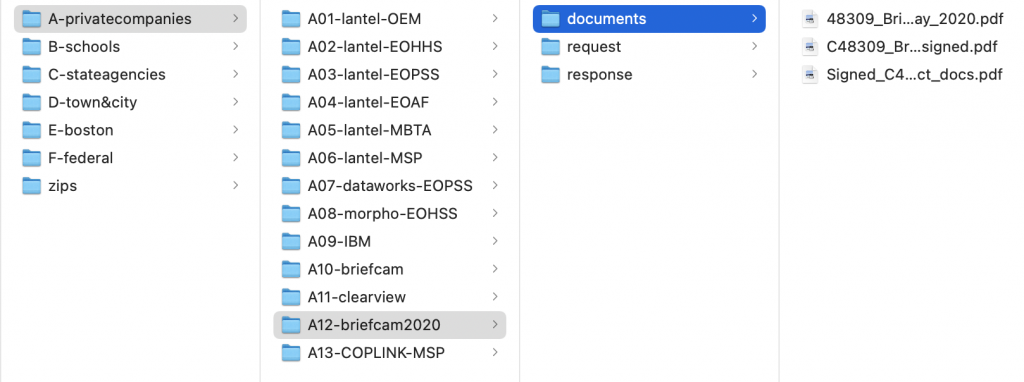
First things first, you’ll need to (re)organize your documents before putting them onto the server, so that all of the documents for a single page are siloed in their own directory. This will make it possible to auto-populate the documents and any metadata in each host page later. Depending on how many documents you have and how well organized they are, this step could take a bit.
In our case, we organized the public records requests into different categories, put the documents into different folders for each public records request, and finally split up different documents based on whether they were ACLU messages, government responses, or responsive documents. We used an alphanumeric naming scheme to preserve our intended order, like so:
Once you’re done building up your directory structure, you’ll upload these document directories so they can be accessed from your site. Unfortunately, to preserve the structure you’ve just built, you cannot simply add your documents to the media gallery through the normal WordPress admin interface. Instead, you’ll need to SSH into your server and upload your documents directly using rsync or an application like Filezilla.
(Warning: it took me several hours to upload 3 GB of files to the server with Filezilla!)
You’ll put all of the documents in the appropriate wp-content/uploads folder. For us, that looked something like this (we’ll represent placeholders in purple):
- /server/path/to/wordpress/site/public_html/wp-content/uploads/2021/03/A-privatecompanies/A12briefcam2020/…
- /server/path/to/wordpress/site/public_html/wp-content/uploads/2021/03/C-stateagencies/C11-dot-frt/…
and so on.
Once your documents are uploaded, they should already be accessible from your site. Verify this by visiting the URL corresponding to a test file, which should be something like this:
https://homeurl.org/wp-content/uploads/year/month/custom/directories/to/filename.ext
Be sure to encode any parts of this URL that include unsafe URL characters like spaces, hashtags, percent signs, apostrophes, or commas.
With encoding, the document that lives on the server at:
will be available at this URL:
Next, the fun part: programmatically writing your pages.
2. Generate content for (many) WordPress pages
This step requires creating two components: a spreadsheet which collects certain information for each page you’re publishing, and a Python script which turns that spreadsheet into page content.
For each page, the spreadsheet must include at the very least:
- The path to that page’s document directory (that we just created in step 1) on your local computer
- Any details you’d want to include on the page (e.g., title, date, descriptive text)
Here’s an example of how it might be structured:
| id | Title | Year | Description | Directory Path |
| A12-briefcam2020 | Briefcam at the City of Boston | 2020 | This FOIA request sees no evil | /local/path/to/A-privatecompanies/A12-briefcam2020/ |
| B01-EOPSS | EOPSS Grants for Surveillance Tech in MA Schools | 2019 | This FOIA request hears no evil | /local/path/to/B-schools/B01-EOPSS/ |
| C11-dot-frt | Face Recognition at the Department of Transportation | 2019 | This FOIA request speaks no evil | /local/path/to/C-stateagencies/C11-dot-frt/ |
And now, Python! The basic idea here is to create templates for the parts of your pages that will be the same, and manipulate the information in the spreadsheet to fill in the parts that are unique.
First, you’ll need to create a template for how you’d like your page to be structured: rows and columns, headings, etc. It might include both WordPress syntax (I use Visual Composer) and raw HTML. Here’s a simple example, a Python string with replacement fields shown in red.
page_template = '''
[vc_row]
    [vc_column][vc_column_text]
        <h2><span style="color: #000000;">Background</span></h2>
        <span style="color: #777777;">
            {description}
        </span>
        <h4>Year:</h4>
        <span>{year}</span>
        <h4>Documents Returned:</h4>
        <span>{n_docs}</span>
    [/vc_column_text][/vc_column]
[/vc_row]

[vc_row][vc_column][vc_column_text]
    <h2>Responsive Documents</h2>
    {docs_table}
[/vc_column_text][/vc_column][/vc_row]
'''
Some of these placeholders – like the description and the year – can be filled in directly from the spreadsheet columns. Others – like the number of documents and the document table – require some further steps.
We can determine the number of documents that will be listed on one page by counting the number of documents within a page’s directory:
import glob
import os
import pandas as pd

# Load spreadsheet with pandas and pull out one row (one page)
all_pages_df = pd.read_excel("db_face_rec_pages.xlsx")
page_metadata = all_pages_df[0]

# Pull out page information from the spreadsheet
description = page_metadata["Description"]
agency = page_metadata["Department"]
category = "Surveillance"
year = page_metadata["Year"]
page_dir = page_metadata["Directory"]

# Count total number of documents
docs = glob.glob(os.path.join(page_dir, "documents", "**"), recursive=True)
n_docs = len([d for d in docs if os.path.isfile(d)])
Writing the raw HTML for the table that will list all documents is a bit more complex. Here, our table will have four columns: a count of files, the file name, type, and size. We iterate through all of the documents inside our page’s directory to fill out docs_table.
import urllib

D4J_root_upload_url = "https://data.aclum.org/wp-content/uploads/2021/02/"

# Create table row (tr) for each document
docs_table = '''
<table><tbody>
    <tr>
        <td>#</td>
        <td>File Name</td>
        <td>File Type</td>
        <td>File Size</td>
    </tr>
'''

doc_filepaths = [d for d in docs if os.path.isfile(d)]
for i, d in enumerate(doc_filepaths):

    # Alternate row color
    row_color = " background-color: #f2f2f2;" if i%2 == 1 else ""

    # Determine the WordPress URL for each document and encode it
    url = D4J_root_upload_url + d.split("dir_for_d4j/")[-1]
    url = urllib.parse.quote_plus(url) # encode

    # Parse the name and extension from the filename
    filename = os.path.basename(d)
    title = os.path.splitext(filename)[0]
    extension = os.path.splitext(filename)[1].upper()[1:]

    # Determine what the file size is (and format in KB/MB/GB)
    size_bytes = os.path.getsize(d)
    if size_bytes < 1e6:
        size = "{:.1f} KB".format(size_bytes / 1e3)
    elif size_bytes < 1e9:
        size = "{:.1f} MB".format(size_bytes / 1e6)
    elif size_bytes >= 1e9:
        size = "{:.1f} GB".format(size_bytes / 1e9)

    docs_table += '''
    <tr style="{row_color}">
        <td>{i_doc}</td>
        <td>
            <a style="color: #006cff;" href="{url}">{title}</a>
        </td>
        <td>{extension}</td>
        <td>{size}</td>
    </tr>
    '''.format(row_color=row_color, i_doc=i+1, url=url, title=title,
              extension=extension, size=size)

docs_table += "</tbody></table>"
With n_docs and docs_table created, we can fill in the main page template:
page_content = page_content_template.format(
        description=description, year=year,
        n_docs=n_docs,docs_table=docs_table)
Finally, we’ll put all of this into a function, and use pandas’ apply()method to repeat it for every row in the dataframe.
def write_wordpress_page(row):
    page_metadata = row
    # Pull out metadata and calculate n_docs
    ....
    # Create HTML docs_table for each doc
    ....
    # Combine templates to produce page_content for this page
    ....
    return page_content

all_page_content = all_pages_df.apply(lambda row: write_wordpress_page(row), axis=1)

# Add this page content strings as a column to the original dataframe
all_pages_df["page_content"] = all_page_content
Now we’ve got the page content for all of the pages we want to make. Our next step is to craft the PHP commands that will publish these pages on our WordPress site.
(For anyone who’s nervous about PHP, worry not: the command we need to do this is extremely simple!)
3. Write PHP commands to create (many) WordPress pages
To get our page content onto the site, we’re going to use a simple PHP function: wp_insert_post(). This function lets you add a new post or page to your site, and lets you specify not only the content of the post but also the title, publishing mode (public, private, password-protected), parent page, author, and more.
We’re going to use a bit more Python to generate these PHP commands – one for each page we want to use. Again, we’re going to start with a template that we’ll customize:
php_snippet_template = '''
// Add page after wp_loaded
add_action( 'wp_loaded', function () {{

    $post_content = "{content}";
    $title = "{title}";
    $new_page = array(
            'post_title'     => $title,
            'post_name'      => strtolower(str_replace(' ', '-', trim( $title ))),
            'post_status'    => 'publish',
            'post_content'   => $post_content,
            'post_type'      => 'page', // Rather than a post
            );

    // Check to make sure the page doesn’t already exist
    $check_page_exist = get_page_by_title( $title, 'OBJECT', 'page');
    if(empty($check_page_exist)) {{
        $page_id = wp_insert_post( $new_page );
    }} else {{
        error_log($title . " page already exists; not inserting new post");
    }}
}});
'''
We just need to fill in the content and title for each page (again using the handy apply() method from pandas), and then write all of the page-creating commands into one long file (I’m calling it insert_all_pages_php_snippet.txt):
def create_php_snippet(row):
    php_snippet = php_snippet_template.format(
        content=row["page_content"],
        title=row["Title"]
    )

    return php_snippet

# Generate a snippet for each row (i.e. for each page)
all_snippets = all_pages_df.apply(lambda row: create_php_snippet(row), axis=1)

# Write the snippets to a file
with open("insert_all_pages_php_snippet.txt", "w+") as fo:
    for s in all_snippets:
        fo.write(s)
Finally, we’re ready to run the PHP on our site and go live with our new pages!
4. Run PHP snippet and publish – once!
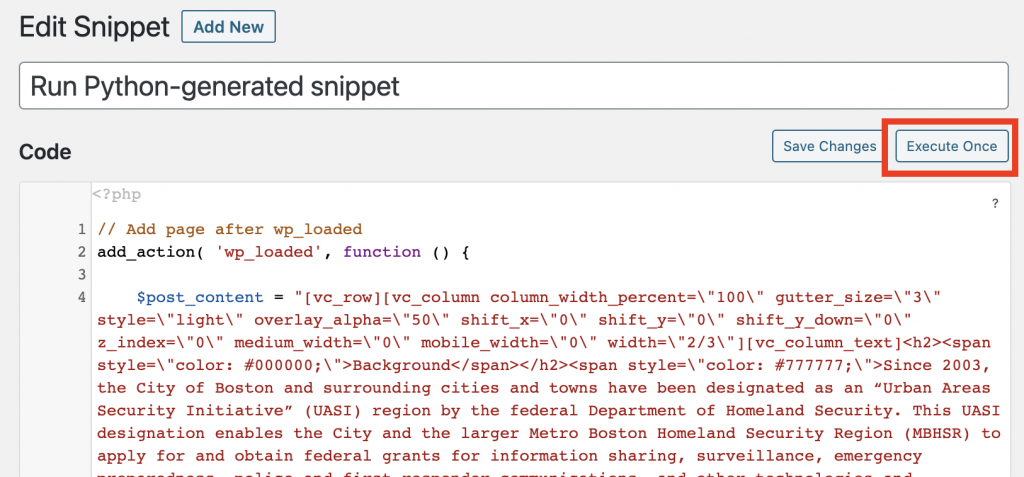
I’ve found that the easiest way to run one-time PHP commands on our WordPress site is with the Code Snippets plugin. This plugin allows you to write, save, and run small chunks of PHP code on your site.
Using Code Snippets, publishing all of the pages is as easy as 1, 2, 3:
- Create a new snippet and select the “Only run once” radio button at the bottom of the code box
- Paste the entire contents of insert_all_pages_php_snippet.txt into the snippet
- Press “Execute Once”
Provided you don’t have any errors in your PHP, that’s that! Ta-da and hallelujah. Let out a deep breath, put on your comfy pants, and grab yourself a beer, because you’re done.
For programmers who want to see how this method was implemented in situ to generate 64 pages housing 1,403 documents on the ACLU of Massachusetts’ facial recognition document repository, checkout our Jupyter notebook on GitHub.
Our notebook also includes examples for how to make more complex pages than detailed here, including:
- Creating pages as children of different parent pages
- Adding buttons on certain pages that link to external sites
- Using HTML to specify custom fonts, colors, and font sizes
- Creating password-protected pages
- Adding custom categories to your generated pages so they’re easier to find
To learn more about the ACLU of Massachusetts’ technical work, explore more around this Data for Justice site: https://data.aclum.org